Hiya! So this week in the DKC is visual week! So for one of our assignments Say it Like the Peanut Butter, we were tasked with making an animated GIF! And I was really excited about this assignment! Making GIFs is one of my favorite thing to make. There are so many endless possibilities to topics of gifs. And I reallly mean it, you can create one for any topic, any movie, any tv show, any commercial! I have some other posts about GIFs over here in GIFs Mania and GIF! These posts are from previous class blogs that I’ve had to create GIFs in. In my GIF Mania post I talk about how confusing GIFs were when I didn’t know how to make them.
A gif image is a loosely created image that is looped to create a small video. And at first I was really confused. Of course I knew what gifs were, thank you tumblr, but I had no idea how to make them. This was a totally new concept to me.
I definitely can say that GIFs become easier to make as you get the hang of things, so if you’re new to them don’t worry! Its all about practice. So make as many as you want!
GIMP:
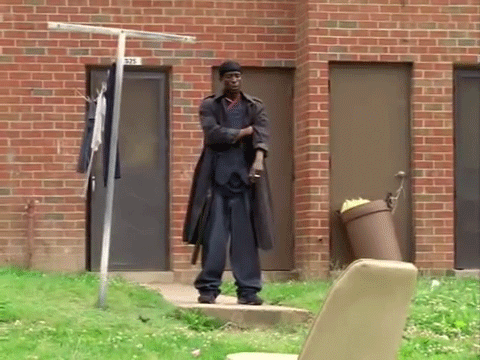
When I was deciding what to use for my GIF I almost immediately thought of the Wire. I’m in Digital Storytelling or ds106 this semester and my section is watching the Wire as part of the class. So I did a quick YouTube search of the Wire, and I found this video:
I thought this would be a great scene to make a GIF on! So I used my hand dandy ClipConverter, and grabbed the video from YouTube to and MP4 file. Then I opened the file in MPEG Streamclip. While in MPEG I found where I wanted the GIF to start, and I went to the top bar and selected Edit and Select In, then I kept watching the clip and selected where I wanted the GIF to end, using Edit and Select Out.


Then after I had my GIF where I wanted it I selected Edit and Trim. Trim shortens the footage so you can export that specific part.

After the trimming phase is done, I went to File then Export to Other Formats

After clicking Export, a window came up

I changed the options so that it would make individual photos, which is Image Sequence. Then I changed the Frame Rate to 8. The Frame Rate is not too big of a deal but unless you want a huge file, keep this one as small as possible. This way I can open each file into GIMP.
After the file is done exporting, you should be left with a string of images like this:

So once you’re done with that, you can open up GIMP. To open the images you go to File and Open as Layers.

Select all of the images that were created when you exported the trimmed clip. You should have a bunch of layers on the right side of the screen:

To create the GIF itself, I went to Filters, Animation, then Optimize (for GIF).

I didn’t do any resizing of the image here so I just exported the file into a GIF. I selected File and Export As.

This window should pop up when you click on the Export As… Where it says Select File Type, you want to drop down that menu and select GIF Image and name your file whatever you want.

Then click Export and a new window should pop up. Make that window look exactly like this window:

Click Export and you’re done! I then uploaded the final file to a website called Giphy where you can upload and view different GIFs. And this is the final product for the GIMP GIF!
Photoshop:
Most of my GIF creating actually happens in GIMP. I’ve never used Photoshop to create a GIF before! So this was definitely a learning experience in itself. Since I didn’t know how to make a GIF in photoshop I did a quick YouTube search and found this video:
Its a simple video that just walks through what to do in creating the GIF.
I used the same main video I used in the GIMP GIF, but I didn’t use MPEG Streamclip to shorten the clip down to the size I want. Photoshop actually allows you to shorten the clip before you import the footage. To import the footage I went to File and Import Video to Layers. Then I selected the file of the video that I used in my last GIF. This window popped open. You want to make sure that you have Selected Range Only selected when you import your file. This allows you to import the shortened clip. You can toggle the start and end point, and photoshop will only import the footage where those points are.

Once the footage is imported the window should look like this:

I didn’t do much to change around the size of the image, so I just went to File and Save For Web. Make sure GIF is selected then hit save. The file should be complete!

This time Giphy wouldn’t let me upload the file, so I just uploaded it to the blog itself. Here it is!
I like Photoshop’s way of creating the GIF because its all in one place. You don’t need multiple applications to create a GIF. The quality of the GIF is better as well. But the only downside to Photoshop, is that you have to pay for it. Anyway, I really enjoyed making these GIFs and it was cool to learn a new way as well!